Publishing Workflow: From Idea to Live Entry
Every page on this wiki goes through the same process, so I modeled it as a BPMN 2.0 diagram.
I am the only person involved, so it has no pools or lanes. Just the steps, and the two checks that can send me back to fix something.
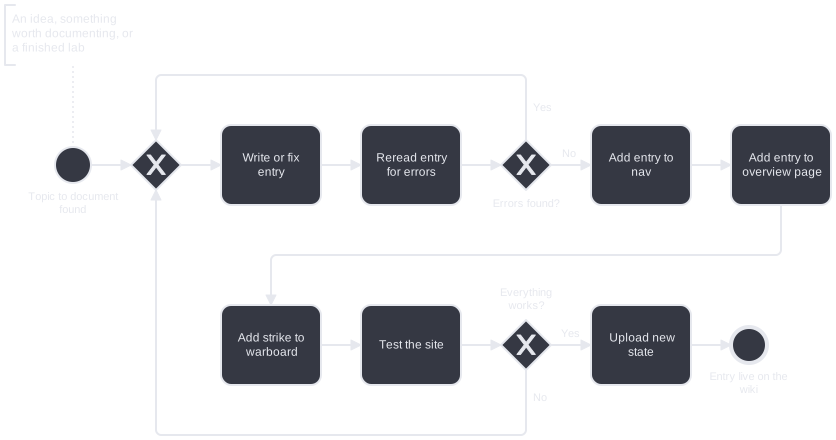
Click to enlarge. BPMN 2.0 source. Rendered with bpmn-js.
Step by Step
1. Find a topic
The process starts when I have something worth writing down. That can be an idea, something I want to document, or a lab I just finished.
2. Write the entry
I write the page as a Markdown file in docs/. I try to give myself a time limit for this, but I don't have a fixed one.
3. Reread it for errors
I read the finished entry again and check it for errors.
- Errors found: back to step 2 to fix them, then I reread it.
- No errors: on to the next step.
4. Add it to the nav
MkDocs builds the site menu from nav in mkdocs.yml, so the new page gets its own line there:
- Publishing Workflow: projects/digital-dojo/03-publishing-workflow.md
5. Add it to the overview page
The overview page of the section links to the new entry, so it can be found from there as well.
6. Add a strike to the warboard
The Completed Strikes list on the Warboard keeps a short history of the newest pages. The new entry goes on top.
7. Test the site
A strict build turns problems like broken internal links into errors:
./bin/lib/check-build.sh
- Something is broken: back to step 2. The fix goes through the reread again.
- Everything works: on to the upload.
8. Upload the new state
./bin/deploy.sh "Commit message"
The script runs the strict build again and stops if it fails. Then it commits and pushes the source to GitHub and publishes the site to GitHub Pages.
9. Entry is live
The new entry is on the wiki, and the process is finished.